How to program an Esp32 using Esp-prog
In this article I will describe how I use Esp-Prog to programm a Esp32 Wroom 32UE module. I usually use the ESP-IDF framework. If you want to follow each step, please install the IDF by following the instructions on Espressif's site.
What is Esp-Prog
The Esp-Prog is an adapter that can be used to flash esp controllers like the Esp32 or the Esp8266. It works as USB to UART bridge like a FTDI board or you can use it to debug your board as it supports JTAG interfaces. In this article I'd like to focus on flashing the boards using the "prog" interface.

Overview of the Esp-Prog board. Image credits: espressif.com
Please note that you can select the voltage level you want to use. This makes the Esp-Prog compatible with many boards. As I manly work with Esp32s, I set the jumper left of the 2.54 mm Prog terminal to 3.3V (Prog PWR SEL in the picture above). To enable the Esp-Prog to reset the Esp, please active "IO0 on/off" by applying a jumper on the pins.

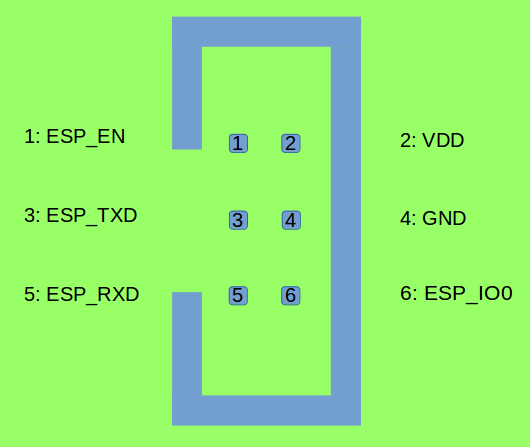
Pinout of the Esp-Prog Prog interface. Image creadit Espressif.com
I will refer to the pin layout of the Esp32 module mentioned in the manual:

Please connect the Esp-Prog pins with following pins of the Esp32:
| Esp-Prog Pin | Esp Pin | Esp Pin function |
|---|---|---|
| ESP_EN | 3 | EN |
| VDD | 2 | 3V3 |
| ESP_TX | 35 | TXD0 |
| GND | 1 or 15 or 38 | GND |
| ESP_RX | 34 | RXD0 |
| ESP_IO0 | 25 | GPIO_0 |
esptool.py
With the installation of the ESP-IDF framework there comes a tool named esptool.py. It can be used to test the connection and, once you know everything is set up properly, to flash the modules. please check if you installed the tool correctly by typing into your command prompt
esptool.py -h
This should output the help for this command. If you get a "command not found" message, please run the
export script in the installation folder of your ESP-IDF framework to make important variables available
for your bash session. If this still does not solve your problem, please check your ESP-IDF installation.
Test the connection
Once you connected your esp board and the Esp-Prog and ensured a correct ESP-IDF installation, you can test the connection by typing to your command prompt
esptool.py --chip esp32 -p /dev/ttyUSB1 chip_id
The parameter --chip gives the esp module to esptool.py. In the example its an esp32.
Parameter -p defines the port to use. In my case it's /dev/ttyUSB1.
pi
chip_id is the command to execute.
Last edit: 2023-11-02
